

17 September 2016
When Simplicity announced it’s Simplicity Sewing Challenge, I thought it was the perfect opportunity to enter my first ever judged sewing challenge/competition. Of course, I had to enter the Vintage Section, even though it was a halter neck top, which is a style of clothing I just don’t wear any more. Oh well, a challenge in more ways than one then! Here is the pattern:

The vintage pattern for the Simplicity Challenge
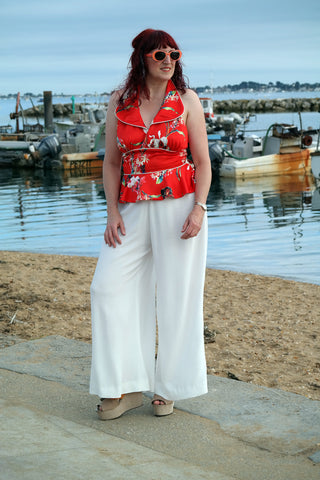
And here is my version I am entering into the challenge:

My 1970’s Outfit for the Simplicity Sewing Challenge 2016 – Vintage Section
So I really got into the challenge and decided that I wouldn’t just make the top, but something to wear with it – my original thought was shorts, but I’m glad I came to my senses and settled on wide-legged 70’s style palazzo pants! I’d just sold this Vogue pattern and decided this was what i wanted to base my outfit on . . .

Vogue 8357 – my inspiration for my outfit
plus a big floppy-brimmed hat of course!

Brigitte Bardot in a floppy brimmed hat – just gorgeous!
I created a board on Pinterest with my ideas of fabrics and 70’s looks – which was quite fun, and resulted in a few late night pinning sprees!
The fabric I decided to use was a wine and cream coloured, elephant print, polyester crepe de chine, which I knew would be tricky to use, but the print was just perfect! (Yes, I know the picture of my top above has no elephants on it, but bear with me here!)

Elephant Print Crepe de Chine
Now, somewhere along the way, I decided that I would make View A with the big collar and the peplum, because if you’re going to do the 70’s, you have to have a big collar!
I also decided that the edge of the collar and the two seams around the midriff section had to have piping inserted into them. I’ve always loved piping, and have intended to insert piping into a garment for years, but have just never quite done it, so, this was an opportunity to set myself another challenge – learn how to put piping into seams (and in a slippery fabric no less).
I also wasn’t sure which size I should make, so, with all the above in mind, I thought I should practice making the pattern in a fabric which I already had in my stash, which was a similar weight and feel to the elephants.
It all started off rather well, my first attempt at putting piping around the collar pieces was a success. However, when I attached the interfaced collar facing to the front of the collar (with the piping already attached to it), it all went a bit haywire. I ended up discovering a few things about piping:
- when using piping purchased from a shop, it will probably have thicker stitching on one side than the other. Make sure you put the slimmer stitching against the edge that will be seen, such as on a collar edge. The only way I could cover up all that thick stitching was to sew ON the cord, which just didn’t work.

At the top you can sort of see the stitching is thicker than on the other side, which is shown in the bottom photo
- do not use interfacing which is too thick for your fabric and then try to attach it to a bouncy fabric with piping attached to its edge! It will be ugly.
- deal with the ends of the piping as soon as you’ve sewn it in. That is, if the cord in the seam allowance is going to cause a problem with an intersecting seam later on. I picked open the fabric casing & trimmed the cord but left the ’empty’ fabric where it was.
I don’t expect any of that really made sense to anyone but me, but at least I can refer back to it next time I tackle piping (which will be soon – I love the way it turned out).
So I ended up with 3 sets of collars in my quest for the perfect piping.
I also made a total dogs dinner of the facing at the front, partly made more difficult because I hadn’t tidied the ends of the piping first, and partly because I just wasn’t being as careful as I should have.

Really? What a mess!
So I ended up doing that all over again, and being more careful the second time around. Finally, two bodices and three sets of collars later, I was happy with the result.

Rejected dogs dinner bodice & two sets of collars!

Bouncy piping – plus you can see that thick stitching

I even tried top-stitching to see if that helped – nope!

Aaah, that’s better!
The rest of the top came together quite easily after that. Phew! But I was pleased that I’d learnt a new skill and had made a better job of the front facing (I seem to have a problem with those quite often).

I’m not used to revealing this much of my back these days!
So why did I not make the final version of the top out of that fabulous elephant fabric? Well, I knew there were going to be some challenges:-
- I wanted large elephants parading around my midriff. However, they were too big to fit on the midriff piece and I couldn’t cut the pattern piece any deeper because I have quite a short torso and it just wouldn’t have fitted me.
- Maybe I could put large elephants on the collars? Nope, they were too big for that as well.
- Ok, well I definitely wanted a string of large elephants parading around the peplum. But a peplum is a curved piece of fabric and the elephants go straight across, so I had thought maybe I could cut out wedge shaped pieces and join them together into a curved peplum shape. When I realised that each elephant was going to have 5 legs, that was the last straw and I abandoned the whole idea of using the elephant fabric at all!
I’d actually grown to quite like my slightly Asian looking, red floral top, so decided that it would be a worthy entry into the challenge. Sometimes you have to realise that something just isn’t going to work, no matter how fabulous it looked in your mind.
So, a few thoughts about the pattern.
- It’s fully lined, which is really nice and gives you a bit of a sense of security since wearing a bra with this top isn’t going to happen!

Apart from the collar, the inside looks the same as the outside, minus the piping – very neat – and I even did some hand stitching, which I normally avoid like the plague!
- Talking of security, I was quite surprised how well it kept my ‘assets’ supported! It’s obviously not as good as a bra, but the midriff section, especially with the piping, acted a bit like an underwire . . . sort of.
- I found it gaped a little at the side, depending on what position my body was in. I think if I made it another time I would either put a dart in or change the shape of the pattern piece.
- My Mother-In-Law saw the pattern and said it looked like a 1950’s fashion, and I can imagine View C (no collar or peplum) being worn with pedal pushers or the bodice of a dress with a full circle skirt! In fact, I just might make View C one day as I can see I would wear it more often because the back is more covered and secure.
Just a couple of things to say about the rest of my outfit:
- I made the palazzo pants from the Great British Sewing Bee book From Stitch To Style. They ended up being absolutely huge on me and I had to take them in probably the equivalent of 2 or 3 whole sizes! I think they ended up a strange length in these photos, but if I wear flat shoes (which I do all the time), then the length is perfect. I’m afraid I will not be making that pattern again though.

Big, baggy, palazzo pants!
- I saw the platform shoes in a charity shop window and knew they had to be part of the outfit!

Aren’t my shoes fab!
- The hat was a thank you present from one of my friends who I decided need some more stylish tops in her wardrobe, so I made her a couple!
I have to say, I felt very stylish walking the length of Poole Quay on a weekday afternoon, wearing my outfit, complete with hat! I really don’t get dressed up often enough. Maybe I should wear my slightly off the shoulder, 1950’s full skirted yellow dress with petticoat next time I have to go out to the post office!
So a big Thank You to Simplicity for the challenge and for supplying the pattern. I challenged myself to learn a new skill, and to wear something which isn’t my usual style.
Plus, after seeing the photos of the back view of the top (you’ve only seen the best one, trust me, the rest were bad!), I’ve now challenged myself to get fitter and do the Couch to 5K program so I can take part in our local ParkRun!
I’ll leave you now with a few more photos.


Ok, gotta flip the hair up!

The clouds were weird that day, no really, they were!

I always get dressed up to walk along Poole Quay to Fisherman’s Dock!
Sorry it was such a long post, but I had a lot to say!