

3 January 2016
I have so many blog posts to write! I really must crack on and get them written. So here is the first one – I made my Mum a quilt!

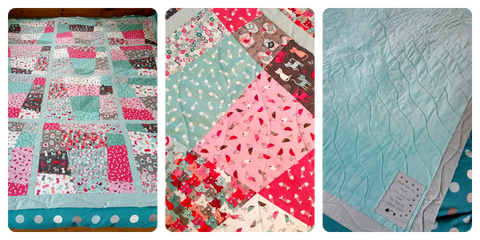
Cat Quilt – All Finished!
I saw this fabric in a quilting shop and fell in love with it, but I didn’t need it. I have so much fabric already and I wasn’t about to make a quilt for myself as I already have one under way. Hmmm, what to do?
And then I hit on an idea – I’ll make a quilt for my Mum! She’s made loads of quilts for friends and family, but I don’t think anyone has made one for her, and I know how much a crafty person appreciates hand made gifts. Right, that was it, she was getting a quilt! Having no idea what pattern I was going to use, I bought a selection of fabrics from the range (only one of which didn’t make it into the final quilt):

The original selection of fabrics I brought home
Then I went in search of a pattern or design to use. I had a few criteria; I wanted the pieces to be quite large so you could see the design of the fabrics, it had to be relatively easy to do since I’ve not successfully made a quilt before and it had to be something I could do quickly – I didn’t want to be working on it for the next 2 years! I decided to use the stack and slash method. Basically I stacked up 12 fat quarters, made a cut across them, rearranged the order of one stack of pieces and sewed them back into squares – then repeated the process 4 more times.

The last cut across the blocks
This kind of gives you the idea of how it worked. Sorry, but I didn’t take any other in progress photos of the block construction process!
Then it was onto deciding how I was going to set out the blocks – all the same way up or all random? And what sashing was I going to use? Here’s a few of the photos I took to help me decide the answers to these questions and the main photo has the sashing all sewn onto the blocks.

Deciding on the block placement and sashing
So I guess I should mention now that instead of the traditional batting and backing, I decided to buy a fleece throw and use that as the backing and batting all in one! I wasn’t sure how it was going to quilt so I had a go on a little sample that I made up from the scraps. I was very impressed!

A little sample to try out some simple quilting
So off I went, with the help of a fabulous Craftsy class – Creative Quilting With Your Walking Foot with Jacquie Gering. I took loads of photos of the quilting process!

Keeping my wavy lines “straight” with the use of strips of masking tape!
Wow! It was now starting to look like a real quilt! Next step was the binding and I decided to make a wide binding, which made life a little more difficult and I had to buy more fabric as well! Oh well, my Mum is worth it! 😀 I’d seen a tip in a Craftsy class that before starting to stitch on your binding, pin it onto your quilt to ensure none of the joins coincide with one of your mitre’d corners as that just looks pants. That was much harder than I anticipated! I finally, after about 4 attempts, managed to wiggle it to the best position I think was possible.

Sewing the binding on so you can mitre the corners
Oh yeah, you then have to join the two ends of the binding together. I was pleased at how that turned out.

Joining the two ends of the binding like a boss! 😉
Now to finish off the binding, I had to sew the corners into mitres . . .

The front and the back – beauteous!
And then I debated whether to sew the binding onto the back properly (by hand) or to cheat (do it on the sewing machine). No matter how hard I tried, I couldn’t get the thing pinned in place properly and knew that if I did it on the machine, it would look terrible, so I settled down with a needle and thread. The thing is, I DON’T do hand sewing! Just as well my Mum is worth it! 😉

Proof I hand sewed the binding on!
I was pretty pleased with the binding, except the fleece curled up inside it with just a little handling, so I had to fix it down. What better way than a row of wavy stitching! I totally winged it at the corners, panicking at each one, but they all ended up looking pretty similar, phew!

A wavy line to hold the binding innards in place!
And then it was finished! Oh, except for a label, every quilt has to have a label. I’m no artist, but I can sort of copy, so I took a couple of designs from the fabric and practised, and practised . . .

The final touch – the quilt label
It was finally completely finished and I was feeling very proud of myself and I wanted to take some lovely photos of it but I had to get it in the post if it was to get to New Zealand in time for Christmas! So I took the best photos I could in the short time and bad lighting that I had. Here are the best ones 🙂

I do just want to mention another Craftsy class which helped me enormously in the making of this quilt – and it’s a free one! Piece, Patch, Quilt: Basic Quiltmaking Skills with Gail Kessler. If you’re new to this quiltmaking lark, then check it out, there’s tons of help and advice in there.
Right, that’s it for this rather long post. Hopefully the next one will follow shortly! Happy Sewing!