

4 October 2014
I have found the pattern I am going to use as my first foray into the world of vintage patterns! Yayy!!!

Butterick Pattern 6887
It is Butterick 6887 and there’s no date on it unfortunately, but the Vintage Patterns Wikia has an indication that it is from around 1954. According to my research Butterick started producing printed patterns in 1950 and this one is not printed so maybe they didn't print every pattern until a few years later.
It meets my requirements perfectly (see Vintage Pattern Pitfall No. 1) and there’s only one pattern piece missing which wouldn’t be a problem if I’d decided to make view C, but I’m not. I’m making view B and it’s the front facing for views A & B. However, I’m pretty confident I can overcome that little hurdle.
The next step was finding some fabric I could live without if it turned into a total disaster. I went through my very small box of “normal” fabric and found a piece of orange, slightly see-through, flowery fabric which sounds awful, but it’s actually very nice, and it was cheap! Just to explain my “normal” fabric reference above, I have boxes and boxes full of stretchy, glittery, sequined, shiny fabrics all destined to become bellydance items of clothing. None of this is suitable for a cute 1950 blouse. I then have a small box of “normal” cotton type fabrics which are not earmarked for something else and this is the box I was referring to.

So where do I start? A few months ago I bought Gertie’s New Book For Better Sewing and she talks in there about using vintage patterns. I skimmed over it when I first bought the book, but I’ve now gone back and studied it a bit more thoroughly as I have something to apply it to now!
Step 1
Gertie says to gently iron your pattern pieces on a low heat with no steam. So I did that. Tick!
Step 2
Next she says to trace the pattern pieces onto new paper. This is good to do for several reasons; it preserves the vintage pattern, and if you need to make fitting adjustments you can do so on your new pattern pieces without fear of destroying the original pattern. After all, it has survived this long, it would be criminal to maim it now just so you can make yourself a pretty top! I actually do this for modern day patterns anyway, so this step is not a big hardship for me.
Step 3
Now comes the interesting part, transferring the markings onto my new pattern pieces. Now I’d heard about these mysterious punched holes in the pattern pieces, but after reading what Gertie had to say, reading the instruction sheet in my pattern which explained what all the holes meant, and looking at the pattern pieces, it’s actually quite straightforward.

Traced pattern piece with holes drawn on and the grain line marked
The three big circles form a line which is the grain line (which I have drawn in already on the picture above.)

Traced pattern piece with dart marked
The smaller holes mark seam lines and there is of course a dart in the middle of the piece which is a seam line, so I’ve joined up those circles to form the dart. The remaining holes are the seam lines around the edge of the piece, but we don’t usually worry about that these days as the pattern states what size seam allowance to use. The notches are just like modern patterns.

Traced pattern piece with triangle pattern of circles
The only other series of holes I had to decipher was a group of 3 holes in a triangle shape (see above). This means to cut this piece with that edge on the fold of the fabric.
So I found it pretty easy to work out the markings on the pattern pieces and I now have what looks like a modern pattern piece to work from. I believe that if you are at all familiar with modern patterns, you’ll be able to handle one of these unprinted patterns without too much trouble. If your instruction sheet is missing, that might cause a few problems though . . .
Step 4
Work out if you need to make any adjustments to the pattern so it will fit you. You may have noticed that I made the front and back a little wider at the hips as there was no way I was going to fit into it as it was. I didn’t adjust the waist or the bust, but I’m thinking I might have to make the waist a little wider as it was quite a snug fit (which might be quite flattering!)
Step 5
I’m going to make a quick muslin, well I’ve got all this chair banqueting fabric so I may as well use it! (Then maybe I can buy some proper muslin!) If that was all double-dutch to you, then see I’m Making My First Ever Chair!
So I’ll post again when I’ve got something vaguely top shaped to show you!
In the meantime, I’ll leave you with a picture of a 1952 Vogue pattern I’ve recently acquired which I think is rather fabulous, or rather it would be if the front bodice piece was in the envelope! Nevertheless, I’m going to have a go at drafting it myself, and if that fails I might call on the talents of a friend or two!
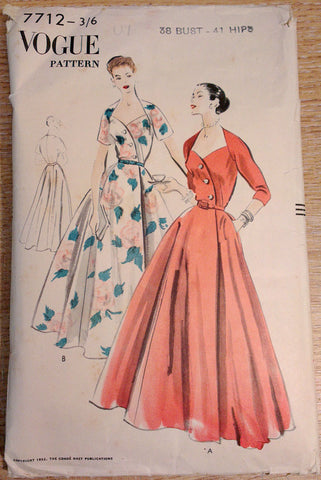
Vogue Pattern 7712 from 1952